 It's been great because I can hook any of my old drives up for quick access. My brother even gave me an old 80GB drive I use for video editing that I essentially use as an external hard drive. I also used this little baby to send everything on the old drives over to my 1TB network-attached storage. If you are in the market for a large external drive and don't mind a certain about of the cyberpunk look, you can save money by getting this if the difference between internal and external drives exceeds $24 + shipping. Just don't let your two-year-old throw drives on the floor unless they are solid-state.
Saturday, March 14, 2009
March of the Tools: Coolgear USB to IDE/SATA Adapter
For years, my husband tore his hair out over me taking over his desktop computer and plugging my hard drives into his motherboard, leaving the side off the case and the hard drives strung out on their IDE cables and sitting on empty CD spindles. When my desktop finally bit the dust, I couldn't access my SATA drive because his motherboard was to old to support it, so he let me buy this:
It's been great because I can hook any of my old drives up for quick access. My brother even gave me an old 80GB drive I use for video editing that I essentially use as an external hard drive. I also used this little baby to send everything on the old drives over to my 1TB network-attached storage. If you are in the market for a large external drive and don't mind a certain about of the cyberpunk look, you can save money by getting this if the difference between internal and external drives exceeds $24 + shipping. Just don't let your two-year-old throw drives on the floor unless they are solid-state.
It's been great because I can hook any of my old drives up for quick access. My brother even gave me an old 80GB drive I use for video editing that I essentially use as an external hard drive. I also used this little baby to send everything on the old drives over to my 1TB network-attached storage. If you are in the market for a large external drive and don't mind a certain about of the cyberpunk look, you can save money by getting this if the difference between internal and external drives exceeds $24 + shipping. Just don't let your two-year-old throw drives on the floor unless they are solid-state.
Friday, March 13, 2009
Online Quilt Shop?
Can anyone recommend a good online quilt shop? With two young children, I have a hard time making it to local stores (when I do, I have the shop owners tearing their hair out with my daughter running around, even though she doesn't touch the merchandise). The one I've used so far has really disappointed me on each of my last three orders, so I'd like to try somewhere new.
I'm interested in trying Connecting Threads because I've really been pleased with Knit Picks and they're owned by the same company, but I'd also like some recommendations for shops that carry fabric from major design houses. Good prices on fabric and shipping would be great, but I'd really love somewhere that doesn't put me on backorder for months on end with no notifications or updates and send me kits with different fabrics than the ones pictured with no apologies.
I'm interested in trying Connecting Threads because I've really been pleased with Knit Picks and they're owned by the same company, but I'd also like some recommendations for shops that carry fabric from major design houses. Good prices on fabric and shipping would be great, but I'd really love somewhere that doesn't put me on backorder for months on end with no notifications or updates and send me kits with different fabrics than the ones pictured with no apologies.
Thursday, March 12, 2009
March of the Tools: Knit Picks Options Needle Set
Don't worry! I'm still planning to finish my Gocco post! I've just had a couple crazy nights with the kids and haven't been able to photograph the finished product in decent light. Anyhow, here is a new post for March of the Tools!
 Last autumn, when I was getting ready to knit this sweater for my daughter, I found that I would need yet more sets of circular needles. The ones in my stash were either the wrong size or the wrong length, or both. Plus, they were all cheap aluminum sets from big box stores like Walmart and Joann and were quite a nuisance while knitting. The cables had too much memory and got tangled up in themselves while the needles were too scratchy and split yarn easily. While knitting, the stitches got caught on the join between cable and needles and it was just an all-around mess.
I decided I needed a pair of interchangeable needles (my center of the brain that justifies craft purchases was working overtime - just think of all the needles I would eventually end up buying at $6+ a pop!) and hit Ravelry to try to find out what set to get. People complained that the Boye set was just too much like the cheap static circs I was trying to get away from. The Denise set had something else wrong - I think maybe it was too sticky for tight knitters like me. The Knit Picks set sometimes had problems with the cables coming out of the metal ends, but Knit Picks was good about replacing them for free. This was before the Addi Click set came out, but no regrets, they are to pricey for a non-socialite like me. So, I took the plunge and purchased the Knit Picks Options nickel-plated set:
 Boy, howdy, did these come in handy! Not only were the needles glossy smooth and the joins nearly undetectable, but the spare cables handily served as stitch holders as well. I love the way the cables flex. I ended up using all of the cables that came with the set on the Tulip sweater - the two smaller sets as holders for the armholes, one larger one to hold the stitches at the bottom hem, and the other large one as a working cable throughout the whole project. I did actually have one of the cables pull free of its metal end cap, but like the Ravelers said, Knit Picks quickly shipped me a replacement free of additional charge. They actually sent a replacement cable set, so now I have three 24" cables and a spare tightening pin and pair of end caps (seeing how I'm always losing small objects, this is a wonderful thing). I also ordered a set of the longest cables available -60"- just to increase the versatility of my set. You know, it was only $4 and I was already paying to have yarn shipped. You never know when you're going to have a spare year to knit a beautiful circular shawl. If only Knit Picks would make a little piece to join to cables end-to-end, I'd be set for life. After I buy the rest of the needle sizes too extreme for the kit, of course. And some matching DPNs.
 I did end up using the set once again on this sweater I knitted for my beautiful baby niece (daughter of Audrey), so just a few more projects and the cost is practically justified! (If anyone wonders, my craft-supply-purchasing brain center and my I'm-in-charge-of-the-family-finances brain center aren't friends. Not at all.)
Last autumn, when I was getting ready to knit this sweater for my daughter, I found that I would need yet more sets of circular needles. The ones in my stash were either the wrong size or the wrong length, or both. Plus, they were all cheap aluminum sets from big box stores like Walmart and Joann and were quite a nuisance while knitting. The cables had too much memory and got tangled up in themselves while the needles were too scratchy and split yarn easily. While knitting, the stitches got caught on the join between cable and needles and it was just an all-around mess.I decided I needed a pair of interchangeable needles (my center of the brain that justifies craft purchases was working overtime - just think of all the needles I would eventually end up buying at $6+ a pop!) and hit Ravelry to try to find out what set to get. People complained that the Boye set was just too much like the cheap static circs I was trying to get away from. The Denise set had something else wrong - I think maybe it was too sticky for tight knitters like me. The Knit Picks set sometimes had problems with the cables coming out of the metal ends, but Knit Picks was good about replacing them for free. This was before the Addi Click set came out, but no regrets, they are to pricey for a non-socialite like me. So, I took the plunge and purchased the Knit Picks Options nickel-plated set:
Boy, howdy, did these come in handy! Not only were the needles glossy smooth and the joins nearly undetectable, but the spare cables handily served as stitch holders as well. I love the way the cables flex. I ended up using all of the cables that came with the set on the Tulip sweater - the two smaller sets as holders for the armholes, one larger one to hold the stitches at the bottom hem, and the other large one as a working cable throughout the whole project. I did actually have one of the cables pull free of its metal end cap, but like the Ravelers said, Knit Picks quickly shipped me a replacement free of additional charge. They actually sent a replacement cable set, so now I have three 24" cables and a spare tightening pin and pair of end caps (seeing how I'm always losing small objects, this is a wonderful thing). I also ordered a set of the longest cables available -60"- just to increase the versatility of my set. You know, it was only $4 and I was already paying to have yarn shipped. You never know when you're going to have a spare year to knit a beautiful circular shawl. If only Knit Picks would make a little piece to join to cables end-to-end, I'd be set for life. After I buy the rest of the needle sizes too extreme for the kit, of course. And some matching DPNs.I did end up using the set once again on this sweater I knitted for my beautiful baby niece (daughter of Audrey), so just a few more projects and the cost is practically justified! (If anyone wonders, my craft-supply-purchasing brain center and my I'm-in-charge-of-the-family-finances brain center aren't friends. Not at all.)
Audrey Joins CraziBeautiful
My sister Audrey has recently joined the staff of CraziBeautiful as a handmade expert.
 Way to go, Auds!
Way to go, Auds!
Wednesday, March 11, 2009

Tuesday, March 10, 2009
March of the Tools: Print Gocco
I've been putting off this post because it is photo intensive, but I will procrastinate no more and dive right in! Here is how I used my Print Gocco machine to make baby announcements for my son:
For my birthday last year (in June!), I got a Print Gocco machine (model PG-10 Super, which I am told is the same as PG-11). Print Gocco is a fabulous little all-in-one device for screenprinting, usually on paper, although you can print on cloth with the right supplies. Here is my Gocco machine (this image is partway through the process I'm going to try to illustrate):
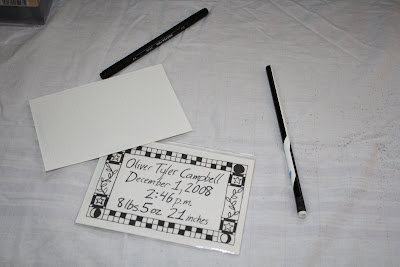
 The first thing I did was draft an image in pencil of the announcement on special gridded paper that is the perfect size for Gocco.
 Then, I colored it in with the Riso carbon pen. (Riso is the Japanese brand that manufactures Gocco. Or at least used to. You can still buy Gocco printers and supplies on eBay, though.)
 I held it up to my window and colored in the places I wanted to have a second color fill. I would have used my lightbox, but it was buried and I was excited to get going.
 The finished masters with the carbon pen.

 Just place a paper on the sticky pad...
 And close the machine. After a few prints, I had the right idea of how much pressure to apply.
 Lift up, and the new print is stuck to the screen. Just peel it off.
 The finished blue prints:
 Once dry, I stacked them. You can see the marblizing I was going for by squirting a little white ink on the blue.
 So, here is the whole process of printing as I did with the black ink. First, I placed the carbon master on the sticky pad.
 Then, I loaded the mesh Gocco screen (it is preloaded with thermal emulsifier).
  I cleaned the contacts of the bulbs on a piece of scrap paper and loaded them into the reflective housing.
 I closed the unit and made sure the master was centered pretty well on the screen.
Then, I attached the lamp housing and pressed down on the unit to complete the electrical circuit and flash the bulbs.
 After flashing, I let the spent bulbs cool. The image is now burned.
 You can see that the master is stuck to the screen. I left it on for inking so the ink wouldn't come through the mesh and make a mess.
 The master plus burned screen ready to be inked.
 There is an attached plastic sheet to contain the ink. This really helps keep the mess to a minimum.
 I squirted the black ink into a plastic ink cone made by Riso. This enables you to have a finer stream of ink than just using the tube because you can cut as small a hole in the corner as you want. After I run out of ink cones, I'm just going to use Ziploc baggies and cut off the corner. They should work even better because the top can be sealed.
 The ink cone all ready to go:
 I used this foam ink blocking to keep the ink contained as well. (The black round object is just my lens cap and the long black object is a neat drying rack Riso makes - well, used to make.)
 Here is the screen with the ink blocking applied.
 The screen after inking. I wanted to have some additional cards without the center writing for coordinating "thank you" cards, so I printed these first.
 The inked screen inserted back into the Print Gocco machine. The master is still stuck to the obverse side.
 Here is the transparent registration plate. Since I am doing a two-color process, I need to line up the black prints with the blue ones. My first print will be on this removable plate.
 I peeled off the master...
 ... and ka-jink! I printed on the registration plate.
 You can see that the black ink on the registration plate is not lined up with the blue print.
 But, never fear! I adjusted the printing pad and they lined up.
 See the little knobs on the bottom of this photo? They allowed me to re-adjust the printing plate and lock it back down into its new place.
On this photo, you can see that in the upper left corner there is a paper guide to ensure each paper is in the exact same place. I used 4x6 inch index cards for this, so they were all precut to the right side (sadly, not acid free, but that's all I could get late at night). This paper guide is spring loaded and can be tucked down if you want to do one-color printing on larger paper.
I removed the registration plate and printed right on the paper. Success!
 After I printed enough cards with a blank center, I inked the lettering on the master screen.
 Check back on this same post soon for the exciting conclusion!
For my birthday last year (in June!), I got a Print Gocco machine (model PG-10 Super, which I am told is the same as PG-11). Print Gocco is a fabulous little all-in-one device for screenprinting, usually on paper, although you can print on cloth with the right supplies. Here is my Gocco machine (this image is partway through the process I'm going to try to illustrate):
 The first thing I did was draft an image in pencil of the announcement on special gridded paper that is the perfect size for Gocco.


I printed the blue ink first (I'll show the whole process of printing with the black ink).
 Just place a paper on the sticky pad...
 And close the machine. After a few prints, I had the right idea of how much pressure to apply.
 Lift up, and the new print is stuck to the screen. Just peel it off.
 The finished blue prints:
 Once dry, I stacked them. You can see the marblizing I was going for by squirting a little white ink on the blue.
 So, here is the whole process of printing as I did with the black ink. First, I placed the carbon master on the sticky pad.
 Then, I loaded the mesh Gocco screen (it is preloaded with thermal emulsifier).
  I cleaned the contacts of the bulbs on a piece of scrap paper and loaded them into the reflective housing.
 I closed the unit and made sure the master was centered pretty well on the screen.Then, I attached the lamp housing and pressed down on the unit to complete the electrical circuit and flash the bulbs.
 After flashing, I let the spent bulbs cool. The image is now burned.
 You can see that the master is stuck to the screen. I left it on for inking so the ink wouldn't come through the mesh and make a mess.
 The master plus burned screen ready to be inked.
 There is an attached plastic sheet to contain the ink. This really helps keep the mess to a minimum.
 I squirted the black ink into a plastic ink cone made by Riso. This enables you to have a finer stream of ink than just using the tube because you can cut as small a hole in the corner as you want. After I run out of ink cones, I'm just going to use Ziploc baggies and cut off the corner. They should work even better because the top can be sealed.
 The ink cone all ready to go:
 I used this foam ink blocking to keep the ink contained as well. (The black round object is just my lens cap and the long black object is a neat drying rack Riso makes - well, used to make.)
 Here is the screen with the ink blocking applied.
 The screen after inking. I wanted to have some additional cards without the center writing for coordinating "thank you" cards, so I printed these first.
 The inked screen inserted back into the Print Gocco machine. The master is still stuck to the obverse side.
 Here is the transparent registration plate. Since I am doing a two-color process, I need to line up the black prints with the blue ones. My first print will be on this removable plate.
 I peeled off the master...
 ... and ka-jink! I printed on the registration plate.
 You can see that the black ink on the registration plate is not lined up with the blue print.
 But, never fear! I adjusted the printing pad and they lined up.
 See the little knobs on the bottom of this photo? They allowed me to re-adjust the printing plate and lock it back down into its new place.On this photo, you can see that in the upper left corner there is a paper guide to ensure each paper is in the exact same place. I used 4x6 inch index cards for this, so they were all precut to the right side (sadly, not acid free, but that's all I could get late at night). This paper guide is spring loaded and can be tucked down if you want to do one-color printing on larger paper.I removed the registration plate and printed right on the paper. Success!
 After I printed enough cards with a blank center, I inked the lettering on the master screen.
 Check back on this same post soon for the exciting conclusion!
March of the Tools: Marga Mill
Tonight we took a trip to the grocery store and I finally gave in and bought a flour mill (aka wheat grinder). I chose the Marga Mulino mill from Italy (Marcato brand - I suspect mulino is just "mill" in Italian). However, since I'm a little strange and love to experiment, the first thing I milled was not wheat but black beans:
 Here is the mill in the only spot in my kitchen that it will clamp to - next to my shallow sink. I had to take out the drawer to get it to work, but I'm glad it fits somewhere. My antique dining table is much too thick to accommodate the c-clamp.
 I could have got an electric mill for $100 more (from Blendtec - that guy with the YouTube "Will it Blend?" videos), but there really is something romantic about old technology and doing things by hand. I also could have purchased a Victorio for $5 less, but this one seemed sturdier and had a larger reservoir.
 It also came with a fetching little brush. Once you take the top cover off, you can see the top two rollers with their diagonal grooves (I believe this is called knurling). There is one more roller below.


I'm rather excited for all the cooking implications this will have (mushroom bisque, fresh homemade bread, rice flour, ground herbs), but I'm really more excited for non-food (yet non-toxic) experiments. I think the first thing I'll try is some finely milled sea salt to make bath salts. I'd love to try crayons for candlemaking, but they'll probably get smashed in the grooves - the wax is probably better suited to a cheesegrater. It would be pretty interesting to send some paper through and see if I can get a nice texture. If you think of anything for me to try, please leave a comment!
Also, if you get one of these and don't get a manual, I found one on Scribd.
Also, if you get one of these and don't get a manual, I found one on Scribd.
Sunday, March 08, 2009
My Latest Article
My latest article, "How to Choose a Pediatrician", has been published in the most recent issue of the Utah Baby Guide. You can read it here.
 Or, if you want to bypass a PDF download and the rest of the issue (which is full of great articles), you can read just my article here.
Monday, March 02, 2009
March of the Tools: Ponoko
I'm still planning on posting about the tools I used to make my own baby announcements, but I just happened to stumble upon this amazing website. The possibilities are making me weak in the knees!
 Basically, you submit a vector file, and you can have it cut in acrylic, wood, felt, or other materials (37 total!). I REALLY need to spend some quality time getting to know Illustrator.
Also, Ponoko has means for you to sell items you make with their service, sell plans to have other people use in their order, or buy plans from other people (there are also a few free plans). They charge mostly according to how long it takes them to make your item, but they will give you a quote by email when you submit your design.
Also, Ponoko has means for you to sell items you make with their service, sell plans to have other people use in their order, or buy plans from other people (there are also a few free plans). They charge mostly according to how long it takes them to make your item, but they will give you a quote by email when you submit your design.
Sunday, March 01, 2009
March of the Tools
If you know me, you know I can hardly resist buying nifty tools. My husband is the same, but goes for the more manly variety. Anyhow, I have decided to participate in Heather Bailey's March of the Tools this year and share some of my favorites with you. I was already planning a post on how I made my own baby announcements and already have a full complement of pictures ready to go.

Project Redux!
I have some fun past projects I'm planning to post here. I'm going to tag them all as project-redux and also have a naming convention for post titles - "Project Redux: _____" First, I'll probably do some re-posts from my collaborative blog with my sister - Two Oh Oh Eight Project(ion)s (we are working on updating the title) since the photos are all ready to go. Then I'm going to start delving into the rest armed with my new DSLR (at least for the ones I haven't given away). If you have requests for anything specific, comment away! Otherwise, I'll probably be pretty random about it.
Subscribe to:
Posts (Atom)