My amazing brother Tom recorded this version of "The Ghost of Tom" which is a song my daughter learned for her preschool program. Enjoy and Happy Halloween!
The Ghost of Tom.mp3
Saturday, October 31, 2009


A Home for the Holidays: Pre-Assignment #4
I know today is very busy for most everyone! Here is a quick and uplifting pre-assignment if you'd like to squeeze it in:
Get rid of 30 items in your house. Throw away or donate as appropriate. If you are having trouble finding 30 things, check your fridge and medicine cabinet for expired items or get rid of magazines and books. The great thing about media is that if you get rid of it and regret it, you can most likely find a replacement online for cheap. My mom just bought several years' worth of her favorite magazine from the '80s on eBay and libraries are great resources, too. You can also count it for an item if you consolidate two things into one container and throw away the empty one (i.e. shampoo, lotion).
Friday, October 30, 2009
A Home for the Holidays: Pre-Assignment #3
Get a notebook (best option - find one you already have!) to be your journal during this challenge. You can also keep an online journal, but I'm planning to gift it to my husband at Christmas if I'm successful. This is your journal, so you can write whatever amount of detail if you like, and include thoughts and feelings or not. I'm also thinking of using a timer and keeping a time card so I can see how much I put into it.
Thursday, October 29, 2009
A Home for the Holidays: Pre-Assignment #2
Here is the second (optional) pre-assignment:
Take pictures of every room in your house in the BEFORE state. You don't ever have to share them and you don't need to document every detail, but paint for yourself a picture of the current state of things so at the end you can see how far you've come.
Wednesday, October 28, 2009
A Home for the Holidays
Would you like to have a beautifully clean and organized home during the winter holiday season? Let's start now! Join me in completing daily assignments (6 a week) and together we'll make it fun and get it DONE! I'm as guilty as any clutterer and this is a guilt-free zone!
Will you join me? Please post below!
Grab our button on the sidebar and feel free to add it to your own blog or site. Or, post a link to this post on your Facebook and choose the button as your thumbnail. Add my feed to your aggregator so you don't forget the daily assignments!
We started November 1st, but if you'd like to warm up before you dive in, here is Pre-Assignment #1
(if you'd like to see a directory of all the assignments so far, click here):
(if you'd like to see a directory of all the assignments so far, click here):
Visualize your home perfectly cozy on Christmas (or your chosen holiday). What does it look like? What are the differences between your current state and your ideal? What things will you have to plan ahead to get ready in time? How about Thanksgiving?
Write down a few of your thoughts (it doesn't have to be long). You can keep it private or share. Also, brainstorm some possible specific goals you'd like to have in mind because some assignments will focus on these.
Write down a few of your thoughts (it doesn't have to be long). You can keep it private or share. Also, brainstorm some possible specific goals you'd like to have in mind because some assignments will focus on these.
Here is my horribly embarrassing writeup (See, I told you I was guiltiest of all! At least it's not as embarrassing as having to have Clean House over for an episode):
I won't go into the details right here, but the bottom line is that my house is a pigsty and I'm just pining for it to be a pleasant place to be. I think having some social interaction and making it a game will really help keep me motivated and rise above the guilt that comes either way (either the house is a mess or I ignore the kids to clean) so I can make positive, lasting changes.
I'd like my house to be less cluttered overall, both from getting rid of things and finding better homes for things.
Living Room: everything is dusted, tabletops are clear, toys and books put away. No more Easter decorations on top of the china cabinet! (how embarrasing!) Carpet is clean.
Kitchen: Countertops and table clean, cabinets and fridge are not busting at the seams so it is easy to find things even if they aren't right at the front. Floor clean without a film over it. Little nooks and crannies are dust-free and clean, wooden fixtures cleaned and oiled. Window blind is fixed and top of the fridge is clean. Would like pre-built cabinets installed above stove and fridge.
Bathroom: Older toiletries tossed, remainder fits in the cupboard well and is organized by type. Everything clean - need a new toothbrush solution. Maybe some wall mount fixtures to free up counter space. Also something with ribbons hanging off to put hair clips on.
Kids' room - carpet is cleaned, scuff marks on wall magic-erased, closet only contains kids' clothes that are current size or bigger. Windowsills and baseboards are dusted. Carpet cleaned.
Bedroom - clothes and jewelry sorted through and organized - only fitting, in-season clothes are in room. Floors are clear and nothing in room that doesn't relate to getting dressed or sleeping. Replace burnt-out bulb and hang extra pictures. Would like to paint a nice color. Maybe also make a space for electronics to charge.
Family room/office - Figure out what to do with old computer parts, clear off desk and go through it and make it a good workspace. Figure out a better configuration of furniture. Pare down the toys - DVDs all in the right cases. Papers filed. Pantry organized.
Storage room - Go through box-by-box and get rid of stuff I don't need. Clearly label the remaining boxes.
Craft room/laundry room - make top laundry shelf usable. Pull out washer/dryer and clean behind them. Make craft room a workroom instead of a storage room.
Downstairs bathroom and bedroom are full of my husband's stuff, so I give myself leave of them until I get the rest of the house under control!
Outside - front porch clear and clean, sweep leaves out of carport. Organize shed.
That makes it sound kind of tame, but I have got a lot of work ahead of me!
I'd like my house to be less cluttered overall, both from getting rid of things and finding better homes for things.
Living Room: everything is dusted, tabletops are clear, toys and books put away. No more Easter decorations on top of the china cabinet! (how embarrasing!) Carpet is clean.
Kitchen: Countertops and table clean, cabinets and fridge are not busting at the seams so it is easy to find things even if they aren't right at the front. Floor clean without a film over it. Little nooks and crannies are dust-free and clean, wooden fixtures cleaned and oiled. Window blind is fixed and top of the fridge is clean. Would like pre-built cabinets installed above stove and fridge.
Bathroom: Older toiletries tossed, remainder fits in the cupboard well and is organized by type. Everything clean - need a new toothbrush solution. Maybe some wall mount fixtures to free up counter space. Also something with ribbons hanging off to put hair clips on.
Kids' room - carpet is cleaned, scuff marks on wall magic-erased, closet only contains kids' clothes that are current size or bigger. Windowsills and baseboards are dusted. Carpet cleaned.
Bedroom - clothes and jewelry sorted through and organized - only fitting, in-season clothes are in room. Floors are clear and nothing in room that doesn't relate to getting dressed or sleeping. Replace burnt-out bulb and hang extra pictures. Would like to paint a nice color. Maybe also make a space for electronics to charge.
Family room/office - Figure out what to do with old computer parts, clear off desk and go through it and make it a good workspace. Figure out a better configuration of furniture. Pare down the toys - DVDs all in the right cases. Papers filed. Pantry organized.
Storage room - Go through box-by-box and get rid of stuff I don't need. Clearly label the remaining boxes.
Craft room/laundry room - make top laundry shelf usable. Pull out washer/dryer and clean behind them. Make craft room a workroom instead of a storage room.
Downstairs bathroom and bedroom are full of my husband's stuff, so I give myself leave of them until I get the rest of the house under control!
Outside - front porch clear and clean, sweep leaves out of carport. Organize shed.
That makes it sound kind of tame, but I have got a lot of work ahead of me!
Thursday, August 27, 2009
Winner time!
We have a winner! Random.org picked the winning number as 5, so the winner is my sister, Audrey!
Doesn't that sound rigged or unfair? Never fear! I am picking a second winner because as much as I love my sister, I don't think it's very nice to invite friends over to play and then not treat them right.
The next number by Random.org was 39, so the second winner is Kat C.! Audrey and Kat C., please contact me and let me know which pair you would like! (I will be contacting them to let them know in case they don't keep up with my blog.
Thank you all so much for playing and for your valuable input!!!
Doesn't that sound rigged or unfair? Never fear! I am picking a second winner because as much as I love my sister, I don't think it's very nice to invite friends over to play and then not treat them right.
The next number by Random.org was 39, so the second winner is Kat C.! Audrey and Kat C., please contact me and let me know which pair you would like! (I will be contacting them to let them know in case they don't keep up with my blog.
Thank you all so much for playing and for your valuable input!!!
Tuesday, August 18, 2009
My First Big Craft Show & a Giveaway!
My sister and I have reserved a craft booth for the annual Peach Days celebration in our hometown. I have been busy making things and am also offering them online for sale, but because of the focus on Peach Days, I am not taking the time to make listings on Etsy. The bulk of my products for Peach Days will be quilted bookmarks and sterling silver earrings with a variety of stone, crystal, glass, and ceramic beads. Here are some photos of the things I've made so far!
 Quilted bookmarks
 The backs are patchwork, too!
 Crystal and sterling silver
 Glass and crystal (all metal is sterling silver, as usual)
 Crystal, glass, and sterling
 Ceramic and sterling
 Ceramic and sterling
 Pearl, jade, citrine, jasper, carnelian and sterling
 Aquamarine, amethyst, peridot, citrine, labradorite, crystal, pink jade, olive jade, coral, and sterling
 Pearl, crystal, carnelian, robin's egg stone,
purple jade and sterling
 Peridot, citrine, aquamarine, amethyst, malachite, labradorite, navy quartz, carnelian, Swarovski Austrian crystal, sterling
 Non-sterling pairs with crystal
 Non-sterling (sterling plate) with purple crystal and other non-sterling pair with red crystal
In order to prepare for Peach Days, I need your help! I need to know which of my earrings people like the most so I can make more of those kinds. Anyone who posts a comment with their top three earring choices will be entered to win a free pair (international entrants welcome)! I will send the winning pair by mail. Be sure that you have a blog I can access to let you know if you've won or else leave me your email address in the comment. The giveaway will run for one week - until midnight (MST) on August 25th.
Bonus entry opportunities:
* Post a link to the giveaway on your blog (3 entries)
* Become my fan on Facebook (1 entry)
* Become a follower of my blog (1 entry)
* Posting on Twitter (1 entry) - be sure to put @azurerocket in the tweet so I can find it!
Leave a comment for each entry you make. I will be checking up to keep things fair!
For example, someone who made every possible entry would leave 7 comments, something like this:
"My favorite earrings are the ladybugs, the purple jade and pearl, and the labradorite trio."
"Link on my blog! http://myblogexample.blogspot.com x 1"
"Link on my blog! http://myblogexample.blogspot.com x 2"
"Link on my blog! http://myblogexample.blogspot.com x 3"
"I am your fan on Facebook!"
"I am following you!"
"Tweeted!"
If there is a huge response to my giveaway, I will be giving away additional pairs of earrings.
Also, if anyone is interested in purchasing something, email me at azurerocket@gmail.com. Bookmarks are $4/each or $3.50 each if purchasing two or more. Sterling silver earrings (all but the three pairs mentioned above are 100% solid sterling silver except for the obvious non-metal parts) are $8/pair or $7.50 if purchasing two or more. The three non-sterling pairs are $6.50/pair. Shipping is $1/flat for the U.S. no matter how many things you buy. Contact me for international shipping prices. You can check my Etsy profile to see my positive feedback as a handmade vendor.
Let the games begin! Thanks for playing!
 Quilted bookmarks
 The backs are patchwork, too!
 Crystal and sterling silver
 Glass and crystal (all metal is sterling silver, as usual)
 Crystal, glass, and sterling
 Ceramic and sterling
 Ceramic and sterling
 Pearl, jade, citrine, jasper, carnelian and sterling
 Aquamarine, amethyst, peridot, citrine, labradorite, crystal, pink jade, olive jade, coral, and sterling
 Pearl, crystal, carnelian, robin's egg stone,
purple jade and sterling
 Peridot, citrine, aquamarine, amethyst, malachite, labradorite, navy quartz, carnelian, Swarovski Austrian crystal, sterling
 Non-sterling pairs with crystal
 Non-sterling (sterling plate) with purple crystal and other non-sterling pair with red crystal
In order to prepare for Peach Days, I need your help! I need to know which of my earrings people like the most so I can make more of those kinds. Anyone who posts a comment with their top three earring choices will be entered to win a free pair (international entrants welcome)! I will send the winning pair by mail. Be sure that you have a blog I can access to let you know if you've won or else leave me your email address in the comment. The giveaway will run for one week - until midnight (MST) on August 25th.
Bonus entry opportunities:
* Post a link to the giveaway on your blog (3 entries)
* Become my fan on Facebook (1 entry)
* Become a follower of my blog (1 entry)
* Posting on Twitter (1 entry) - be sure to put @azurerocket in the tweet so I can find it!
Leave a comment for each entry you make. I will be checking up to keep things fair!
For example, someone who made every possible entry would leave 7 comments, something like this:
"My favorite earrings are the ladybugs, the purple jade and pearl, and the labradorite trio."
"Link on my blog! http://myblogexample.blogspot.com x 1"
"Link on my blog! http://myblogexample.blogspot.com x 2"
"Link on my blog! http://myblogexample.blogspot.com x 3"
"I am your fan on Facebook!"
"I am following you!"
"Tweeted!"
If there is a huge response to my giveaway, I will be giving away additional pairs of earrings.
Also, if anyone is interested in purchasing something, email me at azurerocket@gmail.com. Bookmarks are $4/each or $3.50 each if purchasing two or more. Sterling silver earrings (all but the three pairs mentioned above are 100% solid sterling silver except for the obvious non-metal parts) are $8/pair or $7.50 if purchasing two or more. The three non-sterling pairs are $6.50/pair. Shipping is $1/flat for the U.S. no matter how many things you buy. Contact me for international shipping prices. You can check my Etsy profile to see my positive feedback as a handmade vendor.
Let the games begin! Thanks for playing!
Thursday, June 25, 2009
Something Funny on the Way to the Pool
Today, Lauren and I were taking the kids to the pool. We were stopped at a light near some trees and a squirrel ran out and hopped up into someone's Land Rover! Well, not into the interior, but up inside the body near the rear axle. We were staring at the Land Rover and the driver gave us a funny look; maybe he was feeling guilty for not pulling over for an ambulance and thought we were giving him the evil eye. Anyhow, I didn't see any evidence of the squirrel not making it and hope he survived his little ride.
Monday, June 22, 2009
This Twilight Garden
It's not every day that two completely separate hobbies of mine team up, but it happened recently. I spotted this set of clear silicone stamps by Inkadinkado called "Twilight Garden" and knew they looked familiar:


The title helped give them away. This Twilight Garden is the B-side of a single from the album Wish by The Cure. However, the lettering on the stamp set is actuallystolen from inspired by the cover art of the prior album - Kiss Me, Kiss Me, Kiss Me. I couldn't find anyone else mentioning the link though a Google search, so perhaps I'm the only papercrafting Cure fan so far to stumble across this and think it was blogworthy.


The title helped give them away. This Twilight Garden is the B-side of a single from the album Wish by The Cure. However, the lettering on the stamp set is actually
Wednesday, May 20, 2009
Linocut Tutorial
Hello readers!
My sister Audrey has posted a sweet linocut tutorial over at our collaborative blog. Read it here: Linocut Tutorial
Life has been throwing me a lot of curveballs, but I hope to be posting new things of my own soon.
My sister Audrey has posted a sweet linocut tutorial over at our collaborative blog. Read it here: Linocut Tutorial
Life has been throwing me a lot of curveballs, but I hope to be posting new things of my own soon.
Sunday, May 10, 2009
Audzipan Design
I don't like to clutter my blog with lots of advertisements, but my sister has added a lot of wonderful, reasonably-priced items to her Etsy shop recently. She is currently offering free domestic shipping ($1 international) and a free gift with purchase throuh today.
http://www.audzipan.com
Next: back to regularly unscheduled craft posts
http://www.audzipan.com
Next: back to regularly unscheduled craft posts
Saturday, April 25, 2009
Hello Friends
I am still alive. I had several more March of the Tools posts I wanted to do, but I suppose that will have to wait until next year.
I do have a couple of blog posts in my head (one about my ghost hole - ooooh), but I'm also having my neverending problem of not being able to keep things together.
See you next time I come up for air, hopefully for a bit longer.
I do have a couple of blog posts in my head (one about my ghost hole - ooooh), but I'm also having my neverending problem of not being able to keep things together.
See you next time I come up for air, hopefully for a bit longer.
Saturday, March 14, 2009
March of the Tools: Coolgear USB to IDE/SATA Adapter
For years, my husband tore his hair out over me taking over his desktop computer and plugging my hard drives into his motherboard, leaving the side off the case and the hard drives strung out on their IDE cables and sitting on empty CD spindles. When my desktop finally bit the dust, I couldn't access my SATA drive because his motherboard was to old to support it, so he let me buy this:
 It's been great because I can hook any of my old drives up for quick access. My brother even gave me an old 80GB drive I use for video editing that I essentially use as an external hard drive. I also used this little baby to send everything on the old drives over to my 1TB network-attached storage. If you are in the market for a large external drive and don't mind a certain about of the cyberpunk look, you can save money by getting this if the difference between internal and external drives exceeds $24 + shipping. Just don't let your two-year-old throw drives on the floor unless they are solid-state.
It's been great because I can hook any of my old drives up for quick access. My brother even gave me an old 80GB drive I use for video editing that I essentially use as an external hard drive. I also used this little baby to send everything on the old drives over to my 1TB network-attached storage. If you are in the market for a large external drive and don't mind a certain about of the cyberpunk look, you can save money by getting this if the difference between internal and external drives exceeds $24 + shipping. Just don't let your two-year-old throw drives on the floor unless they are solid-state.
Friday, March 13, 2009
Online Quilt Shop?
Can anyone recommend a good online quilt shop? With two young children, I have a hard time making it to local stores (when I do, I have the shop owners tearing their hair out with my daughter running around, even though she doesn't touch the merchandise). The one I've used so far has really disappointed me on each of my last three orders, so I'd like to try somewhere new.
I'm interested in trying Connecting Threads because I've really been pleased with Knit Picks and they're owned by the same company, but I'd also like some recommendations for shops that carry fabric from major design houses. Good prices on fabric and shipping would be great, but I'd really love somewhere that doesn't put me on backorder for months on end with no notifications or updates and send me kits with different fabrics than the ones pictured with no apologies.
I'm interested in trying Connecting Threads because I've really been pleased with Knit Picks and they're owned by the same company, but I'd also like some recommendations for shops that carry fabric from major design houses. Good prices on fabric and shipping would be great, but I'd really love somewhere that doesn't put me on backorder for months on end with no notifications or updates and send me kits with different fabrics than the ones pictured with no apologies.
Thursday, March 12, 2009
March of the Tools: Knit Picks Options Needle Set
Don't worry! I'm still planning to finish my Gocco post! I've just had a couple crazy nights with the kids and haven't been able to photograph the finished product in decent light. Anyhow, here is a new post for March of the Tools!
 Last autumn, when I was getting ready to knit this sweater for my daughter, I found that I would need yet more sets of circular needles. The ones in my stash were either the wrong size or the wrong length, or both. Plus, they were all cheap aluminum sets from big box stores like Walmart and Joann and were quite a nuisance while knitting. The cables had too much memory and got tangled up in themselves while the needles were too scratchy and split yarn easily. While knitting, the stitches got caught on the join between cable and needles and it was just an all-around mess.
I decided I needed a pair of interchangeable needles (my center of the brain that justifies craft purchases was working overtime - just think of all the needles I would eventually end up buying at $6+ a pop!) and hit Ravelry to try to find out what set to get. People complained that the Boye set was just too much like the cheap static circs I was trying to get away from. The Denise set had something else wrong - I think maybe it was too sticky for tight knitters like me. The Knit Picks set sometimes had problems with the cables coming out of the metal ends, but Knit Picks was good about replacing them for free. This was before the Addi Click set came out, but no regrets, they are to pricey for a non-socialite like me. So, I took the plunge and purchased the Knit Picks Options nickel-plated set:
 Boy, howdy, did these come in handy! Not only were the needles glossy smooth and the joins nearly undetectable, but the spare cables handily served as stitch holders as well. I love the way the cables flex. I ended up using all of the cables that came with the set on the Tulip sweater - the two smaller sets as holders for the armholes, one larger one to hold the stitches at the bottom hem, and the other large one as a working cable throughout the whole project. I did actually have one of the cables pull free of its metal end cap, but like the Ravelers said, Knit Picks quickly shipped me a replacement free of additional charge. They actually sent a replacement cable set, so now I have three 24" cables and a spare tightening pin and pair of end caps (seeing how I'm always losing small objects, this is a wonderful thing). I also ordered a set of the longest cables available -60"- just to increase the versatility of my set. You know, it was only $4 and I was already paying to have yarn shipped. You never know when you're going to have a spare year to knit a beautiful circular shawl. If only Knit Picks would make a little piece to join to cables end-to-end, I'd be set for life. After I buy the rest of the needle sizes too extreme for the kit, of course. And some matching DPNs.
 I did end up using the set once again on this sweater I knitted for my beautiful baby niece (daughter of Audrey), so just a few more projects and the cost is practically justified! (If anyone wonders, my craft-supply-purchasing brain center and my I'm-in-charge-of-the-family-finances brain center aren't friends. Not at all.)
Last autumn, when I was getting ready to knit this sweater for my daughter, I found that I would need yet more sets of circular needles. The ones in my stash were either the wrong size or the wrong length, or both. Plus, they were all cheap aluminum sets from big box stores like Walmart and Joann and were quite a nuisance while knitting. The cables had too much memory and got tangled up in themselves while the needles were too scratchy and split yarn easily. While knitting, the stitches got caught on the join between cable and needles and it was just an all-around mess.I decided I needed a pair of interchangeable needles (my center of the brain that justifies craft purchases was working overtime - just think of all the needles I would eventually end up buying at $6+ a pop!) and hit Ravelry to try to find out what set to get. People complained that the Boye set was just too much like the cheap static circs I was trying to get away from. The Denise set had something else wrong - I think maybe it was too sticky for tight knitters like me. The Knit Picks set sometimes had problems with the cables coming out of the metal ends, but Knit Picks was good about replacing them for free. This was before the Addi Click set came out, but no regrets, they are to pricey for a non-socialite like me. So, I took the plunge and purchased the Knit Picks Options nickel-plated set:
Boy, howdy, did these come in handy! Not only were the needles glossy smooth and the joins nearly undetectable, but the spare cables handily served as stitch holders as well. I love the way the cables flex. I ended up using all of the cables that came with the set on the Tulip sweater - the two smaller sets as holders for the armholes, one larger one to hold the stitches at the bottom hem, and the other large one as a working cable throughout the whole project. I did actually have one of the cables pull free of its metal end cap, but like the Ravelers said, Knit Picks quickly shipped me a replacement free of additional charge. They actually sent a replacement cable set, so now I have three 24" cables and a spare tightening pin and pair of end caps (seeing how I'm always losing small objects, this is a wonderful thing). I also ordered a set of the longest cables available -60"- just to increase the versatility of my set. You know, it was only $4 and I was already paying to have yarn shipped. You never know when you're going to have a spare year to knit a beautiful circular shawl. If only Knit Picks would make a little piece to join to cables end-to-end, I'd be set for life. After I buy the rest of the needle sizes too extreme for the kit, of course. And some matching DPNs.I did end up using the set once again on this sweater I knitted for my beautiful baby niece (daughter of Audrey), so just a few more projects and the cost is practically justified! (If anyone wonders, my craft-supply-purchasing brain center and my I'm-in-charge-of-the-family-finances brain center aren't friends. Not at all.)
Audrey Joins CraziBeautiful
My sister Audrey has recently joined the staff of CraziBeautiful as a handmade expert.
 Way to go, Auds!
 Way to go, Auds!
Wednesday, March 11, 2009

Tuesday, March 10, 2009
March of the Tools: Print Gocco
I've been putting off this post because it is photo intensive, but I will procrastinate no more and dive right in! Here is how I used my Print Gocco machine to make baby announcements for my son:
For my birthday last year (in June!), I got a Print Gocco machine (model PG-10 Super, which I am told is the same as PG-11). Print Gocco is a fabulous little all-in-one device for screenprinting, usually on paper, although you can print on cloth with the right supplies. Here is my Gocco machine (this image is partway through the process I'm going to try to illustrate):
 The first thing I did was draft an image in pencil of the announcement on special gridded paper that is the perfect size for Gocco.
 Then, I colored it in with the Riso carbon pen. (Riso is the Japanese brand that manufactures Gocco. Or at least used to. You can still buy Gocco printers and supplies on eBay, though.)
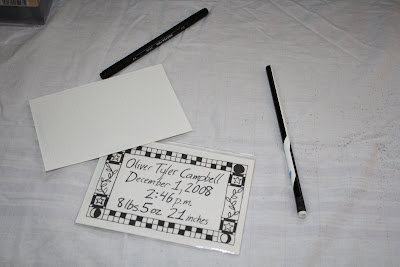 I held it up to my window and colored in the places I wanted to have a second color fill. I would have used my lightbox, but it was buried and I was excited to get going.
 The finished masters with the carbon pen.

 Just place a paper on the sticky pad...
 And close the machine. After a few prints, I had the right idea of how much pressure to apply.
 Lift up, and the new print is stuck to the screen. Just peel it off.
 The finished blue prints:
 Once dry, I stacked them. You can see the marblizing I was going for by squirting a little white ink on the blue.
 So, here is the whole process of printing as I did with the black ink. First, I placed the carbon master on the sticky pad.
 Then, I loaded the mesh Gocco screen (it is preloaded with thermal emulsifier).
  I cleaned the contacts of the bulbs on a piece of scrap paper and loaded them into the reflective housing.
 I closed the unit and made sure the master was centered pretty well on the screen.
Then, I attached the lamp housing and pressed down on the unit to complete the electrical circuit and flash the bulbs.
 After flashing, I let the spent bulbs cool. The image is now burned.
 You can see that the master is stuck to the screen. I left it on for inking so the ink wouldn't come through the mesh and make a mess.
 The master plus burned screen ready to be inked.
 There is an attached plastic sheet to contain the ink. This really helps keep the mess to a minimum.
 I squirted the black ink into a plastic ink cone made by Riso. This enables you to have a finer stream of ink than just using the tube because you can cut as small a hole in the corner as you want. After I run out of ink cones, I'm just going to use Ziploc baggies and cut off the corner. They should work even better because the top can be sealed.
 The ink cone all ready to go:
 I used this foam ink blocking to keep the ink contained as well. (The black round object is just my lens cap and the long black object is a neat drying rack Riso makes - well, used to make.)
 Here is the screen with the ink blocking applied.
 The screen after inking. I wanted to have some additional cards without the center writing for coordinating "thank you" cards, so I printed these first.
 The inked screen inserted back into the Print Gocco machine. The master is still stuck to the obverse side.
 Here is the transparent registration plate. Since I am doing a two-color process, I need to line up the black prints with the blue ones. My first print will be on this removable plate.
 I peeled off the master...
 ... and ka-jink! I printed on the registration plate.
 You can see that the black ink on the registration plate is not lined up with the blue print.
 But, never fear! I adjusted the printing pad and they lined up.
 See the little knobs on the bottom of this photo? They allowed me to re-adjust the printing plate and lock it back down into its new place.
On this photo, you can see that in the upper left corner there is a paper guide to ensure each paper is in the exact same place. I used 4x6 inch index cards for this, so they were all precut to the right side (sadly, not acid free, but that's all I could get late at night). This paper guide is spring loaded and can be tucked down if you want to do one-color printing on larger paper.
I removed the registration plate and printed right on the paper. Success!
 After I printed enough cards with a blank center, I inked the lettering on the master screen.
 Check back on this same post soon for the exciting conclusion!
For my birthday last year (in June!), I got a Print Gocco machine (model PG-10 Super, which I am told is the same as PG-11). Print Gocco is a fabulous little all-in-one device for screenprinting, usually on paper, although you can print on cloth with the right supplies. Here is my Gocco machine (this image is partway through the process I'm going to try to illustrate):
 The first thing I did was draft an image in pencil of the announcement on special gridded paper that is the perfect size for Gocco.


I printed the blue ink first (I'll show the whole process of printing with the black ink).
 Just place a paper on the sticky pad...
 And close the machine. After a few prints, I had the right idea of how much pressure to apply.
 Lift up, and the new print is stuck to the screen. Just peel it off.
 The finished blue prints:
 Once dry, I stacked them. You can see the marblizing I was going for by squirting a little white ink on the blue.
 So, here is the whole process of printing as I did with the black ink. First, I placed the carbon master on the sticky pad.
 Then, I loaded the mesh Gocco screen (it is preloaded with thermal emulsifier).
  I cleaned the contacts of the bulbs on a piece of scrap paper and loaded them into the reflective housing.
 I closed the unit and made sure the master was centered pretty well on the screen.Then, I attached the lamp housing and pressed down on the unit to complete the electrical circuit and flash the bulbs.
 After flashing, I let the spent bulbs cool. The image is now burned.
 You can see that the master is stuck to the screen. I left it on for inking so the ink wouldn't come through the mesh and make a mess.
 The master plus burned screen ready to be inked.
 There is an attached plastic sheet to contain the ink. This really helps keep the mess to a minimum.
 I squirted the black ink into a plastic ink cone made by Riso. This enables you to have a finer stream of ink than just using the tube because you can cut as small a hole in the corner as you want. After I run out of ink cones, I'm just going to use Ziploc baggies and cut off the corner. They should work even better because the top can be sealed.
 The ink cone all ready to go:
 I used this foam ink blocking to keep the ink contained as well. (The black round object is just my lens cap and the long black object is a neat drying rack Riso makes - well, used to make.)
 Here is the screen with the ink blocking applied.
 The screen after inking. I wanted to have some additional cards without the center writing for coordinating "thank you" cards, so I printed these first.
 The inked screen inserted back into the Print Gocco machine. The master is still stuck to the obverse side.
 Here is the transparent registration plate. Since I am doing a two-color process, I need to line up the black prints with the blue ones. My first print will be on this removable plate.
 I peeled off the master...
 ... and ka-jink! I printed on the registration plate.
 You can see that the black ink on the registration plate is not lined up with the blue print.
 But, never fear! I adjusted the printing pad and they lined up.
 See the little knobs on the bottom of this photo? They allowed me to re-adjust the printing plate and lock it back down into its new place.On this photo, you can see that in the upper left corner there is a paper guide to ensure each paper is in the exact same place. I used 4x6 inch index cards for this, so they were all precut to the right side (sadly, not acid free, but that's all I could get late at night). This paper guide is spring loaded and can be tucked down if you want to do one-color printing on larger paper.I removed the registration plate and printed right on the paper. Success!
 After I printed enough cards with a blank center, I inked the lettering on the master screen.
 Check back on this same post soon for the exciting conclusion!
Subscribe to:
Posts (Atom)